I can’t believe that it has taken me this long to play around with Atmel microcontrollers. Sure, I’ve used the Arduino platform many times but I haven’t actually programmed an Atmel chip without using Arduino code. I’ve been really interested in using an AtTiny for a project and while I could burn in the Arduino bootloader, I decided that I would take this opportunity to get messy, take chances and make (a whole lot) of mistakes.
I prefer to do a lot of my development on OSX or Linux. I use Windows only when I absolutely have to. I wasn’t too inclined on downloading AVR Studio so when I found out that there was a nice package for OSX for AVR development, I was pretty thrilled.
In this post, I will show you how to upload code onto an ATTiny85 microcontroller on Mac OSX. The code will make use of the PWM Modules in the ATTiny85 to fade an LED on and off. It’s a bit more elaborate “hello world” program over the regular blinky programs.
Stuff You Need
- Download and install Crosspack. Crosspack contains everything you need to compile code for your AVR device.
- You will need an AVR programmer. I use the AVR Pocket Programmer from Sparkfun. Apparently, there have been issues getting it to work on OSX, but I haven’t had any troubles with it so far. I have a mid 2012 Macbook Air running Mountain Lion. You can however, use any AVR programmer like the ISP mk2 from Atmel themselves.
- You will, of course, need an ATTiny85 microcontroller.
- Finally, You will need an LED and a current limiting resistor (100 Ω will do nicely).
Coding
Open up a text editing program like Vim or TextEdit and copy and paste the following code. SaveAs the document as “hello.c”
[c]
// Quick example for the ATTiny85 which fades an LED on and off
// Set clock speed to 8 MHz
#define F_CPU 8000000
#include
#include
void main(void)
{
// Setup PWM
TCCR0A |= (1 << COM0A1) | (1 << WGM00) | (1 << WGM01);
TCCR0B |= (1 << CS01);
DDRB |= (1 << PB0);
int i = 0;
while(1)
{
// Fade LED on
for(i = 0; i < 255; i++)
{
// Load new value onto OCR0A register to change duty cycle
OCR0A = i;
_delay_ms(1);
}
// Fade LED off
for(i = 255; i >= 0; i–)
{
OCR0A = i;
_delay_ms(1);
}
}
}
Connecting to the uC
Before we start programming, we first need to connect the programmer to the chip. Development boards like the Arduino have what’s called the “ICSP Header.” ICSP stands for “In-Circuit Serial Programmer.” This can be a 3×2 or 5×5 pin header but that isn’t overly important. The important thing is that we have six connections in the programmer to be concerned about:
- Vcc
- GND
- MISO
- MOSI
- SCK
- Reset
If you’re familiar with communication protocols, you might recognize this as SPI communications. Understand where these connections exist in your programmer and then connect them to the uC while referring to the datasheet:

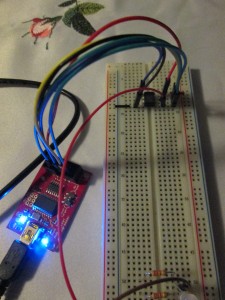
You should now have a setup similar to this:

Connect your programmer to your computer open up Terminal (you can do a spotlight search for “Terminal”).
Downloading Code onto the uC
1. In the Terminal, go to the directory where “hello.c” is stored. For example, if it’s in a folder called “test” type:
[shell]
$cd test
[/shell]
2. Now, we will compile the code with avr-gcc (the GNU compiler collection is used to compile code written for the AVR architecture!). This will create an object file called “hello.o”
[shell]
$avr-gcc -Os -mmcu=attiny85 -c hello.c
[/shell]
3. Next, we need to link the object file, “hello.o” to a binary file which we create as “hello.elf” You can read more about the “elf” files in this Wikipedia article
[shell]
$avr-gcc -mmcu=attiny85 -o hello.elf hello.o
[/shell]
4. One of the uses of elf files is an executable (for Unix and Unix-like systems). However, our uC can’t understand this format. They understand hex files however so we need to further refine the file to create a suitable hex file. To achieve this, we can use the avr-objcopy utility:
[shell]
$avr-objcopy -j .text -j .data -O ihex hello.elf hello.hex
[/shell]
5. Finally, we are ready to flash our uC with our code. To do this, we use the avrdude utility, but there is one gotcha to be aware of. The following line will program our uC:
[shell]
$avrdude -P usb -p t85 -c usbtiny -e -U flash:w:hello.hex
[/shell]
However, proper execution depends on the right programmer defined. If you have the Pocket AVR Programmer like I do, then “-c usbtiny” is correct. However, if you have a different programmer, type:
[shell]
$avrdude -c ?
[/shell]
This brings up a list of programmers. Find your programmer and copy the name after “-c” then press return.
Now, our uC is programmed! The LED should now be fading on and off.
For more information on avr-gcc/avr-objcopy and avrdude, consult the avr-libc manual found here. You’ll also learn more about the arguments in the lines we just typed in for programming there.
